TIM user manual 2.3
Welcome to TIM... ... 2.3!
TIM is the next generation handheld solution for the hospitality industry. TIM is easy to use, reliable, intuitive and quick. Oh, and we almost forgot: downright good looking. Even though we think most of you will never even need this manual, we figured we’d write it for those of you that get carried away and don’t find some of the neat features we put in there, like the reverse check view or item editing. We hope you enjoy your new TIMe saving handheld application!
Table of Contents
Selecting a profile
At the beginning of each business day TIM will ask you what profile you would like to work with today. This profile assigns you a menu, default check printer, revenue center and more. As you can still change this profile during the day, TIM gives you all the flexibility you could ever need.
Logging in
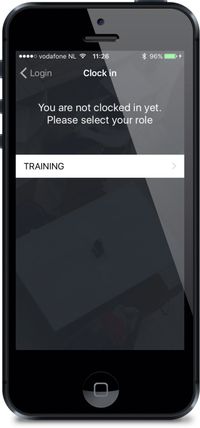
You can log in to TIM using your Aloha ID, and optionally your password. Type your ID into TIM and press ‘OK’. If you did not yet previously clock-in, then TIM will allow you to do so by selecting your jobcode. If you use the original TIM employee cards you can use the QR code on the back for secure logging in. Just press the little QR button in the top right corner to activate the camera and scan the QR code on your employee card.
The Linea Pro device allows you to log in from this screen by swiping your employee magcard or scan your QR code.
NOTE: The user should make sure to press the profile button after logging out. This will make sure the profile is released for the next user.
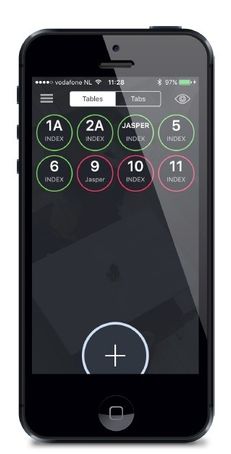
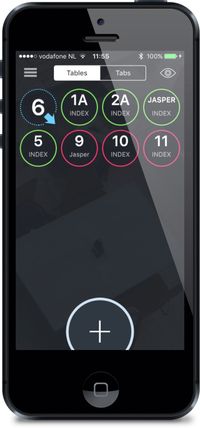
Check overview
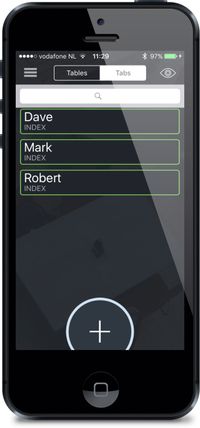
After you logged into TIM you are presented with the tableoverview. This shows you the accessible tables. Green tables are owned by you, other tables are pink. You can access a table by selecting it. Pressing the + button allows you to open a new table. With the Tabs and Tables buttons at the top of the screen you can easily switch between Tabs and Tables.
Opening a table or tab
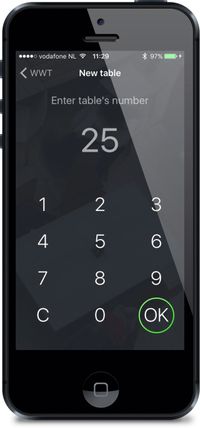
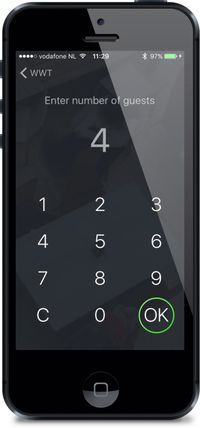
Opening a table or tab is a piece of cake. Either select one of the already listed tables or tabs, or press the big +. Depending on whether you are in the table or tab view, you will be presented with either a numeric keypad or a keyboard. After entering a tablenumber or tabname you will be asked for a guestcount. Alternatively, if you press the big + button on the check overview screen and enter the number for a table already opened, TIM will access that table instead of trying to open a new table with that number. Isn’t that smart?
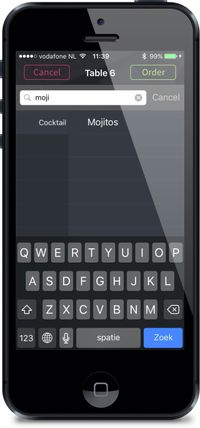
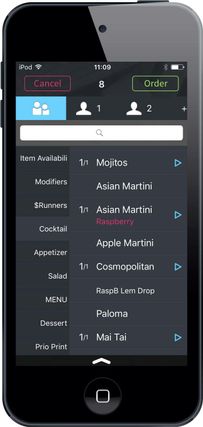
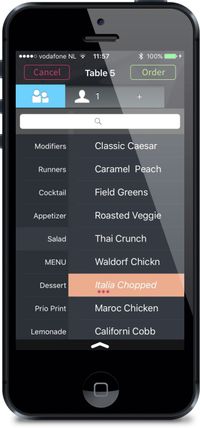
Ordering items
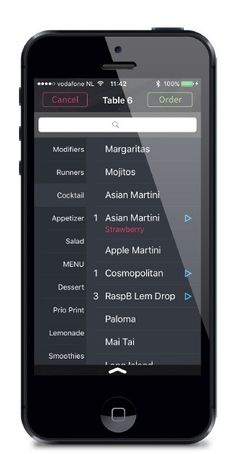
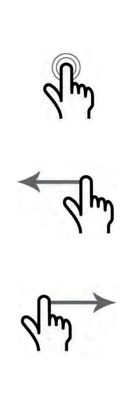
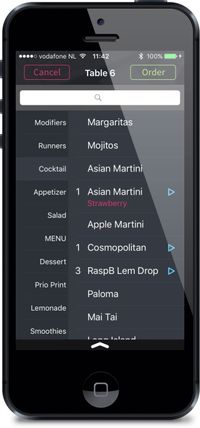
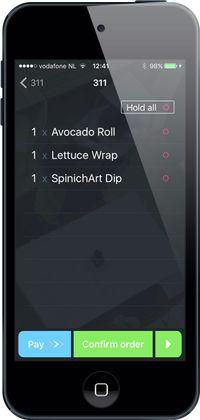
After you accessed a table or tab you’ll be able to order some items. Ordering items is easy. Press an item to order it and swipe with your finger from right to left to delete it. Swipe from left to right to enter a quantity. When you have selected all items you want to order, press the green Order button to go to TIM’s order confirmation screen.
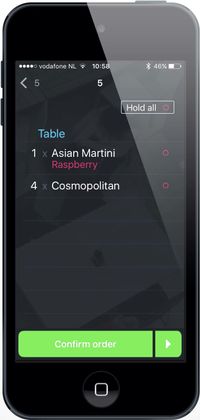
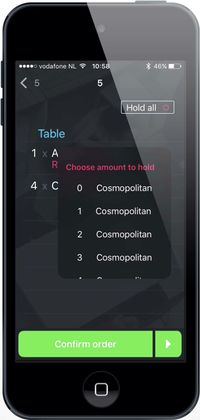
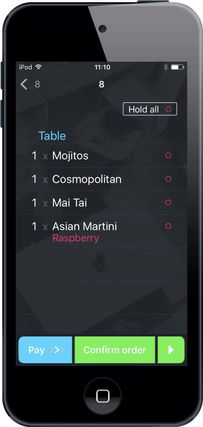
When you finished your order and pressed the green Order button, you are presented with the confirmation screen to give you an overview of the items. Items can be put on hold, or removed from hold status by pressing the pink circle. Also, press the Back button to go back to the item selection screen or press Cancel to completely cancel your order. If you decide the order is correct, either press the green Confirm Order button to order the items, or press the little green button to the right of it to select from alternative Aloha Order modes.
Swiping to the left will delete items in the confirmation screen. Swiping to the right will help you change the quantity of that item.
Modifying items
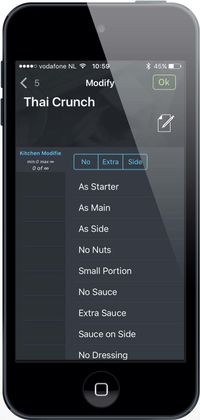
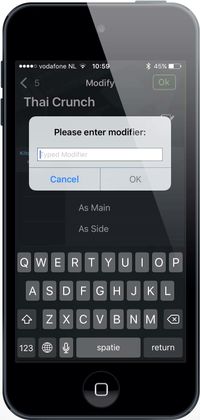
Modifying items in TIM is as easy as you would expect it to be. When you want to order an item with a modifier, all you need to do is click on the blue arrow icon next to it. This will bring you to the modifier groups assigned to the item you selected. You can order modifiers from different groups or type your own by pressing the little pen & paper icon. The NO, EXTRA and SIDE buttons give you the option to add modifier codes to the items.
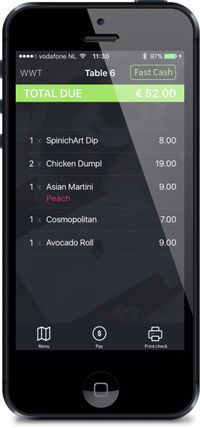
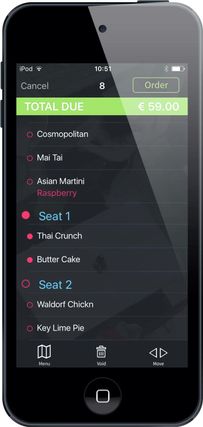
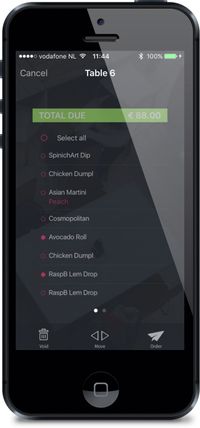
Check detail view
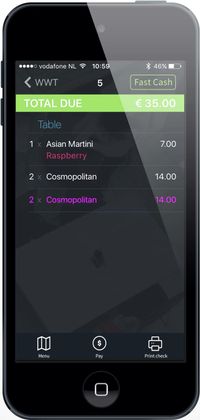
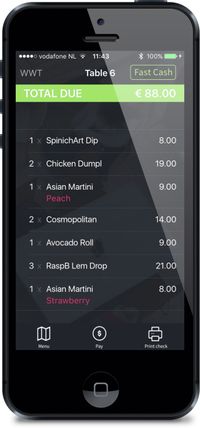
The check detail screen gives you an overview of all the orders for a table or tab. From here you have several options: you can look through multiple checks by swiping from left to right or right to left with your finger, you can close the check to cash with the Fast Cash button, order more items with the Menu button or navigate to the payment screen to close the check with the Payment button.
However, there are two more options that might not be as evident as the ones mentioned above. The first one is called Item Editing and can be used by touching the check for half a second. The second option is the Reverse Check View and can be activated by turning the iPod upside down. You can read about these awesome features in the next chapters.
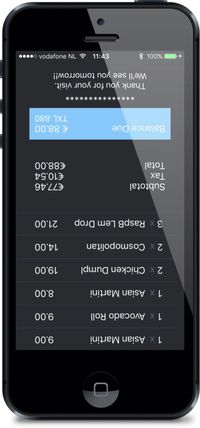
Reverse check view
The reverse check view is an excellent way of presenting your customers their check without having to waste paper (don’t we all want to do as much as we can to save our environment?). As an added bonus it looks pretty amazing, especially if you add your own logo to the top of the check. How to add your own logo is described in our Installation manual.
Note: When 'portrait orientation lock' is active this function will not be available.
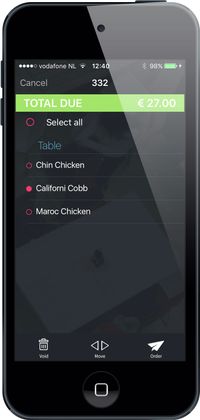
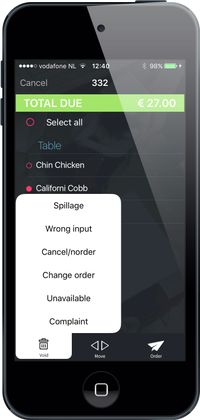
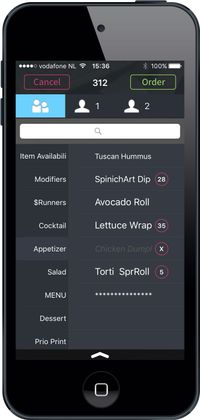
Item editing
When you want to manipulate items on a check, all you have to do is press the check for half a second, and you will enter item editing mode. This mode enables you to void items, order previously held items or split the check and move items. Just select the items you want to edit or press "Select all", and press the corresponding button. If configured, a void will request a void reason. Moving items is as easy as selecting a new check by swiping to the right.
Also, you can repeat an order by selecting items and pressing the order button. In the latest version it's also possible to add menu items to a re-order.

 re-order
 move
move
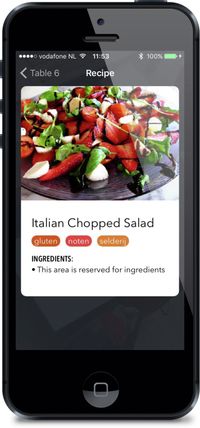
Recipes
If you want to see what ingredients an item contains, what wine pairing is advised or simply what the item looks like, you can view recipes right from TIM. To view a recipe in TIM you can hold a menu item that has a recipe attached to it. Tim will show you which items have recipes attached by showing a recipe label.
Recipes will also show allergens now! Once defined in the TIM Recipe Editor recipes will show tags with allergen information.

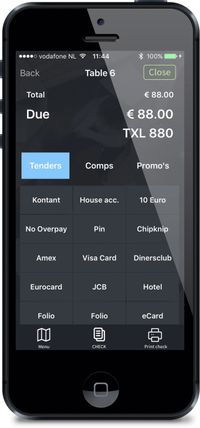
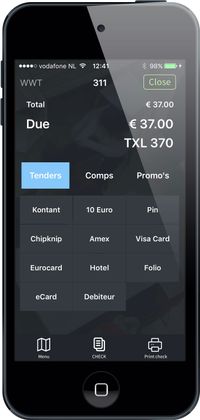
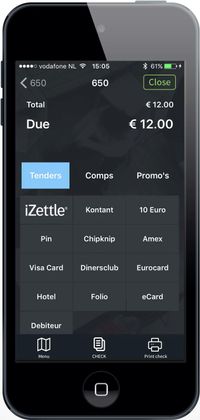
Payment screen
After pressing the payment button in the check view screen, you will enter the payment screen. This screen allows you to either apply a full or partial tender, one of the defined comps or a promo. If the balance of a check is already reduced to zero, you can close a check with the Close button. Selecting the Print check button gives you the option of either emailing or printing a check. The check will be printed at the default checkprinter for the used profile, or the checkprinter selected in the functions screen.
Foreign currencies will also show under amount due and as change in the confirmation messaging.

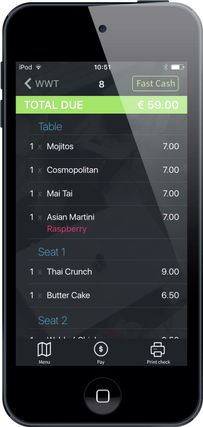
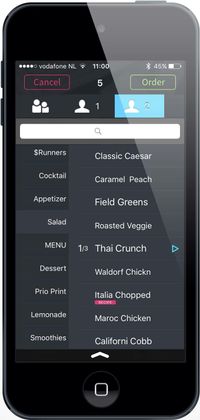
Pivot Seating
Once Pivot Seating is enabled in Aloha Manager the user will see the different guests in the Menu View. When a new table/tab is started the amount of guests will be created equal to the number of guests entered. Should you need to add a person you can simply add more guests to the table/tab.
Items to be ordered will show on any guests split check in a (for example) "1/3" format. This means the item will be ordered 3 times for the table/tab, of which 1 will be for the selected guest.
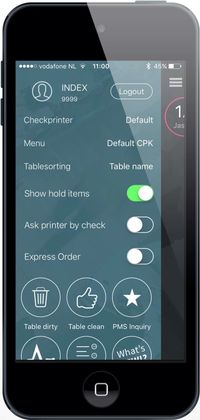
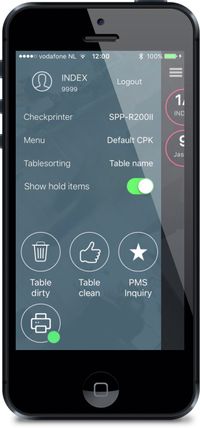
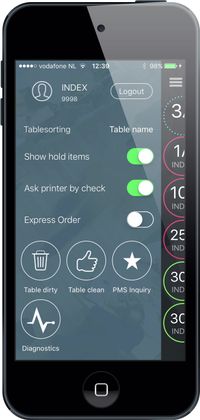
Functions screen
The functions screen is where you find other options you might require during operation:
- The Logout button logs you out of TIM and returns you to the employee login screen.
- Under Preferences you will find the ability to select a preferred checkprinter, the ability to sort your Tables and Tabs differently, what Aloha POS menu you want to use and if you would like to show a "hold item" status (Tables will show an (H) if there are items on hold).
- The Hostess tab gives you functions to Dirty and Clear a table. This can be used in conjunction with Aloha Guestmanager, QSR’s Hostess product and other tablemanagement systems that leverage the Aloha ProHost interface.
- If you are using TIM in a hotel environment and Aloha is interfaced to the PMS, you will see the option PMS inquiry which allows the user to perform a room inquiry.
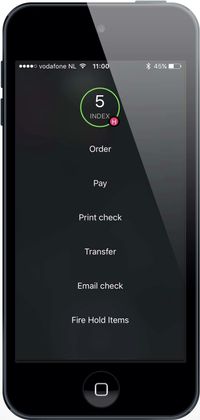
Quick Access (Order, Pay, Transfer, Print Check and E-mail Check)
Why stick to Aloha logic when we can skip actions to save time and focus on our guests. Long pressing a table or tab will give the user the possibility to access the table or tab order screen, payment screen, transfer a table/tab or print/e-mail a check.
Transfer Table/Tab
Tranfer Table/Tab functionality is only available with Aloha 6.7 or higher
To transfer a table/tab to an employee the user needs to press a table/tab until the Quick Access menu appears and then select Transfer. An employee selection screen appears where the user is able to select the employee to receive the transfer. After selecting an employee the user will see a confirmation message of the last transfer action. The send table will appear in blue with an outgoing arrow on the top of the Table Sceen.
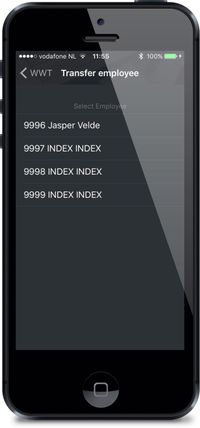
The receiving employee will see a blue incoming arrow, also on the top. The receiving employee is able to accept the table to a new table, existing table, new tab or existing tab.

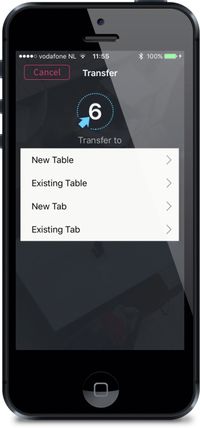
To Fast Transfer a table the user also needs to press a table/tab until the Quick Access menu appears and then select Transfer. Only now an options screen appears where the user can directly transfer to a new table, existing table, new tab or existing tab.
Note: The same logic is added to transfer Tabs in the Tab Screen
Note2: Using either regular Transfer or Fast Transfer depends on the Aloha configuration.
Quick Logout
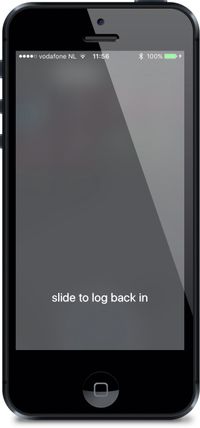
With the Quick Logout function the user is able to quickly logout on TIM, and login to an order entry terminal for full management functionality usage as this is not (yet) fully supported by TIM.
With a slide from right to left in the Table/Tab screen the user starts the Quick Logout and is now able to login on another device. To log back in a simple slide to the right will get the user back in TIM.
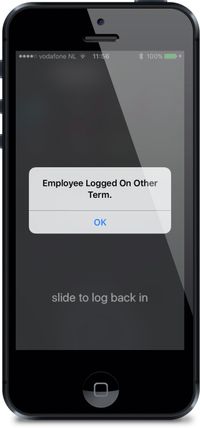
Don't worry about forgetting to log back in. TIM will automatically log you out officially after 5 minutes, where in this case the user will need a Mag Card (Linea Pro), QR-code or password to log back in. Also when you forget to logout on the order entry terminal, TIM will warn you as you try to use the "log back in" functionality.


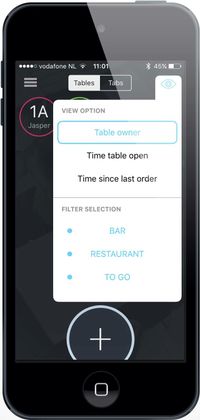
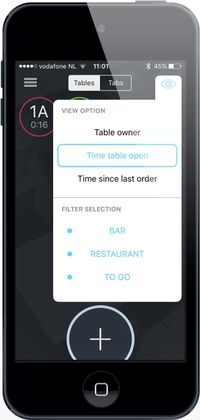
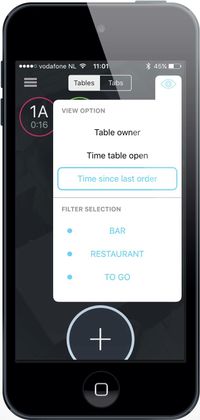
View Options
Pressing the little eye button on the top right corner will guide you through the view selection options. Default TIM is set to Table Owner view.
Pressing Time table open TIM will give you the time the table is open (time since first check order)
Pressing Time since last order TIM will give you the time since the last order on that check
Pressing (de-selecting) Table owner TIM will give you no extra information part from the Table number
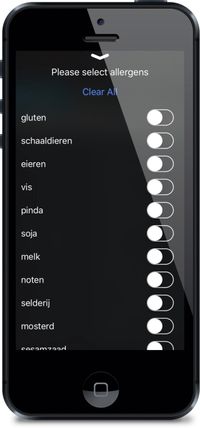
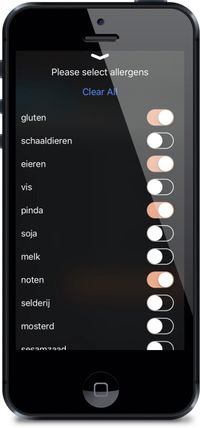
Allergens + Allergen Filter
Based on the fact that the Dutch government changed the law regarding allergen information in restaurants we have implemented an allergen filter in TIM. Once allergens are linked to items with the TIM Recipe Editor the user is able to make a selection of allergens in the filter based on allergies mentioned by the guests. Items with defined allergens (in the TIM Recipe Editor) will light up once selected in the allergen filter. These items can still be ordered, but TIM will let you know to be cautious, based on the users input regarding allergens. Are you moving on to the next guest who does not have any allergies? Simply tap the "Clear all" button and all references regarding allergens will be back to normal.
To access the Allergen Filter swipe the bottom arrow to the top of the menu.
TIM will make it easy helping the guest select an item on the menu without any of the in the filter selected allergens. Also imagine the time (is Money) you will save not having discussions with your chef! ![]()
Note: When a recipe is available for a certain item, the user is able to view the linked allergens in detail with a long press on the item.
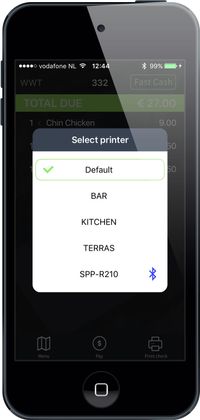
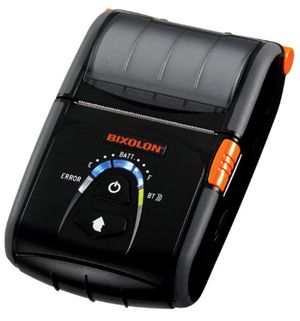
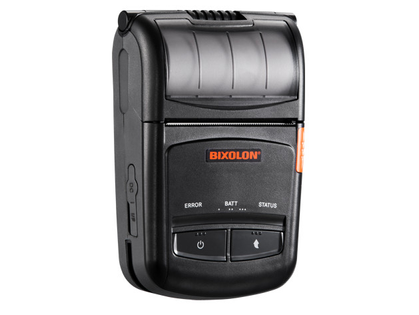
Bluetooth Printing
Just another Time saver! Next to being able to show the check at the table (TIM reversed check view) or sending the guest an e-mail with the check (TIM mail) we have implemented the TIM Bluetooth functionality for Bixolon Bluetooth printers.
After pairing (HOW TO PAIR ON iOS) the Bluetooth device navigate to the functions menu > preferences to select a default check printer. After TIM detects the Bluetooth device the user is able to select the printer. You will now be able to print guest checks from your (Batman![]() ) utility belt!
) utility belt!
Note: To check the status of the printer or print a test print please navigate to functions menu > Bluetooth printer status
Note 2: Should you want to switch devices, please make sure you un-pair the Bluetooth printer on the 'old' iPod before it shows on any other iPod
Currently we support the following devices for bluetooth printing:
SPP-R210
SPP-R200II
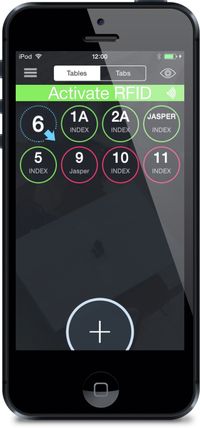
RFID scanning with Linea Pro 6 (only for X-plan interface users)
TIM, once attached to a Linea Pro, is now able to scan RFID tags/bracelets to pick up check information from Tables and Tabs defined by Aloha/X-plan. To use this functionality, simply press the 'Activate RFID' button to scan the tag. TIM will show this functionality once setup in the backoffice.
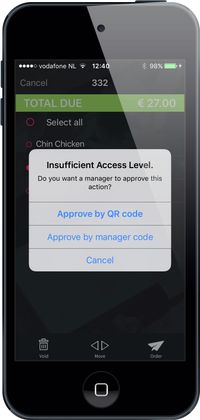
Manager comp/void approval
Should a user not have the rights to either comp a check (or items on it) or to void items on a check this has to be approved by a user with managers rights. TIM will automatically notice if the access level is insufficient and will show a pop-up for the user to have the comp/void approved by a manager. This can be done by password, qs-code or magcard swipe (when using Linea Pro). With this new functionality the user can simply walk up to a manager instead of having the manager come to him/her at the order entry terminal.
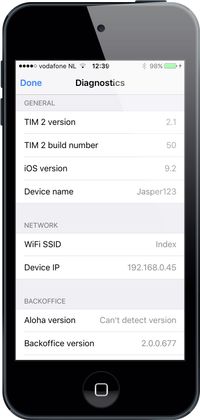
Diagnostics
To improve support on TIM we have created a new diagnostics functionality. With this new functionality the user is able to press the diagnostics button in the functions screen to pickup all information regarding TIM, network, iOS and backoffice.
Express order
With express order the user is able to navigate from the confirmation screen directly to the payment screen. Another time saver which can be used to quickly order items on a check and close it to any tender. Simply swipe the pay button to the right to access the payment screen. As you can see we have taken into account that the user will not accidently press this button...
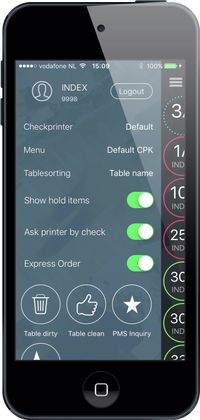
Ask printer by check
This functionality makes it possible to have TIM ask which check printer the user would like to use at the moment of pressing the print button. This will also work on the 'print check on close' functionality.
Item Availability
Item availability is used to inform users how many items are still available. The availability of items is updated every time the users enters the menu screen. Also the availability will count down on the client once items are selected. TIM will still generate an error message once items should not be available anymore on confirming the order.
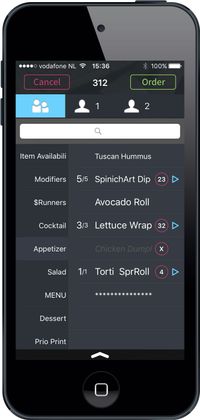
Item Availability Overview
In addition to the Item Availability functionality we've now created a list giving the user an overview of all limited- or non-available items. The user can change the view to limited available items only or non-available items only. Also check out the refresh button!
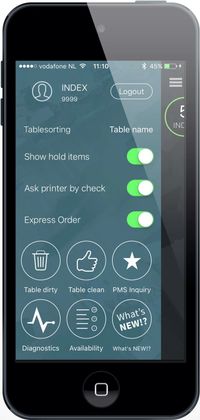
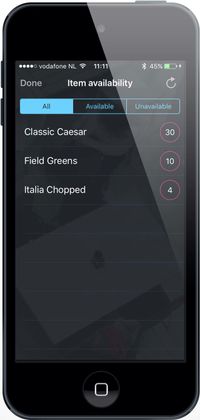
Table Filter (NEW)
The user is now able to filter the Table Overview screen (WWT) based on Revenue Centers. When starting the app all Revenue Centers will be visible. Simply deselect the Revenue Centers you don't want to see and TIM will filter them out for you. The user is still able to open new tables that might be filtered out, but won't see them in the WWT screen.
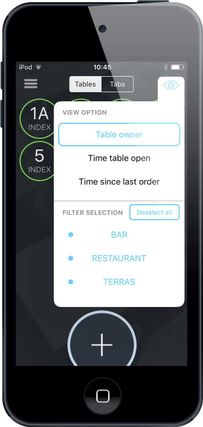
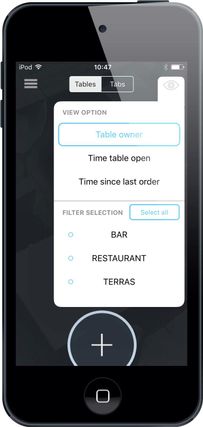 added select/deselect all
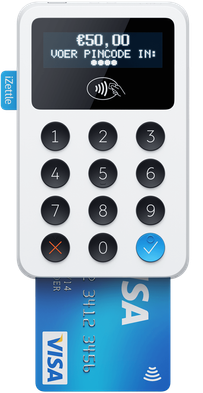
iZettle Mobile Payment (The Netherlands only)
Once iZettle is setup in the backoffice and the iZettle device is paired with the iPod, the iZettle button will appear in the functions screen. Pressing this button will navigate the user to the iZettle options where the user can login (this procedure is only needed once). Once logged in the iZettle button will appear on position 1 in the payment screen and can be used for mobile payments. (HOW TO PAIR IZETTLE)
Remember to order some Bixolon Bluetooth printers to create some serious efficiency in your operation!
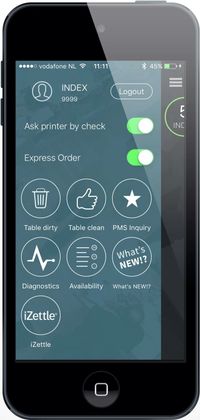

What's NEW?!
Missed the e-mail and wondering what's new in the latest version of TIM? Check out the What's NEW?! functionality in the functions screen whenever you like!
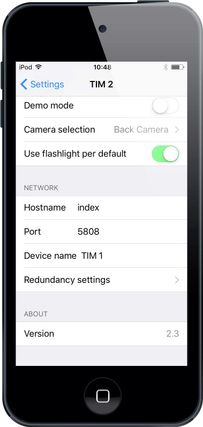
TIM Redundancy (NEW)
With TIM 2.3 the user is able to setup a redundancy server for TIM. A separate dedicated TIM server with the same TERM ID as the primary server is mandatory.
The TIM 2.3 client needs to be setup with the redundancy settings.